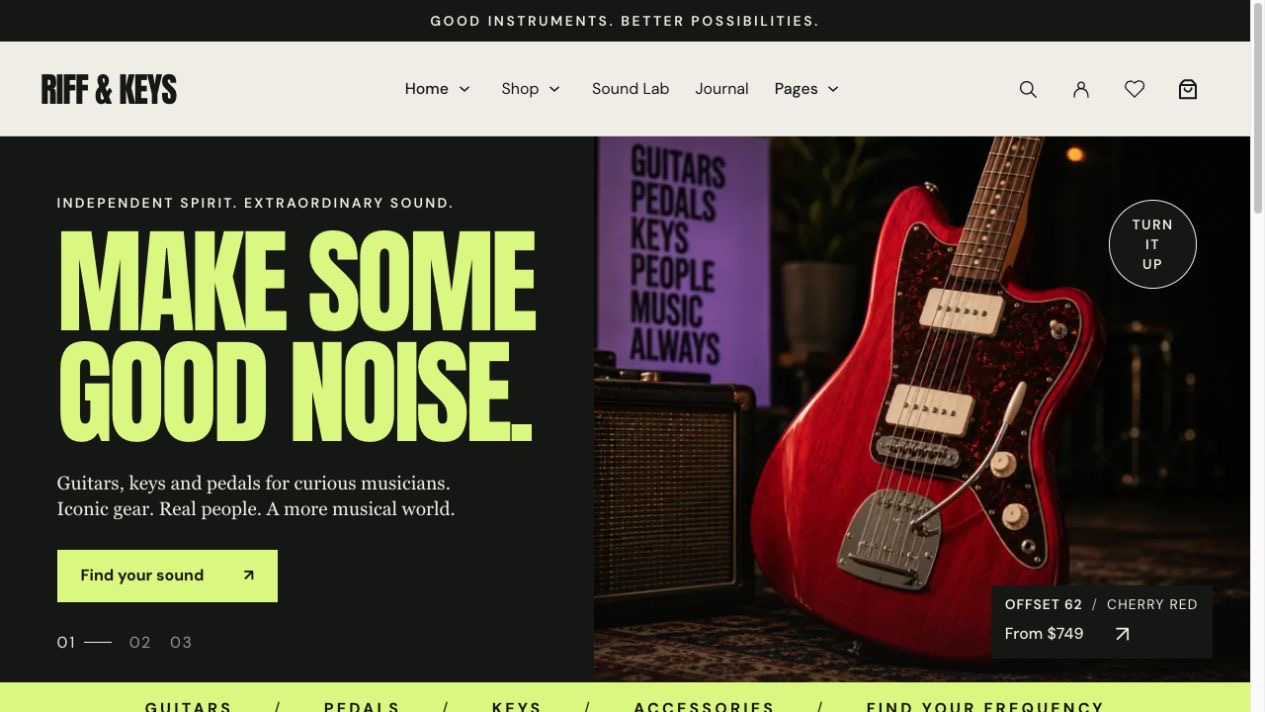
Home 1 — The Original
Editorial / Bold
Install, personalize and run Riff & Keys, one clear step at a time.
No matching chapters. Try another term or clear the search.
Build a music store with a point of view. Riff & Keys is a WordPress block theme for guitars, pedals, keyboards and accessories, with five distinct homepages and native WooCommerce shopping layouts.
Install the theme → activate WooCommerce and the demo integrations → import a collection → choose your homepage → replace the demo content → configure and test your store.
This customer guide covers theme 0.7.32, Card Tools 0.1.15, Atelier Demo Import 1.3.0 and Atelier Demo Export 1.1.0. It describes the files and controls supplied with these versions. WordPress and plugin menu labels may differ with language and version.
The theme uses the native block editor and Site Editor. Elementor or another page builder is not required. Theme activation does not import products, create customer accounts or change your homepage.
Reference environment used during development: WordPress 7.1.4, WooCommerce 11.2.1, Apache PHP 7.4.24 and CLI PHP 8.4.1. This is the tested local environment, not a promise for every hosting or extension combination.
Extract the download first. Upload each installable ZIP through its matching WordPress screen; the complete tools kit is not a theme installer.
| File / plugin | Purpose | Who needs it? |
|---|---|---|
riff-keys-0.7.32.zip | Theme, templates, patterns, local fonts and homepage preview images. | Every site using the design. |
| WooCommerce | Products, cart, checkout, orders and customer accounts. | Stores accepting purchases. |
riffkeys-card-tools-0.1.15.zip | Wishlist, Compare, Quick View and product story/media fields. | Sites using these optional features. |
atelier-demo-import-1.3.0.zip | Preview, inspect and import a demo ZIP. | Customers who want demo content. |
riffkeys-demo-1.2.0.zip | Content package; upload inside Import Demo. | Demo import only; not a plugin. |
| Contact Form 7 | Contact Us form. | Sites using the contact form integration. |
| MC4WP: Mailchimp for WordPress | Newsletter form and Mailchimp connection. | Sites using the newsletter integration. |
atelier-demo-export-1.1.0.zip | Create portable demo packages on a source website. | Theme authors; customers do not need it to import. |
Install WooCommerce, Contact Form 7 and MC4WP from their official WordPress plugin listings. Their service accounts, paid plans and configuration are separate from the theme.
Import is under Appearance → Import Demo. Export is under Tools → Export Demo. Each works without the other being active; the schema 1 ZIP connects the source and destination websites.
riff-keys-0.7.32.zip, install it and activate Riff & Keys.Riff & Keys is the active theme, Appearance → Editor opens the Site Editor, and WooCommerce product/settings screens are available when WooCommerce is active. An empty catalog before adding or importing products is normal.
Use the controls shown below in order. The screenshot sequence shows the ZIP selection screen and the resulting active theme; the ZIP filename should match the version you received.
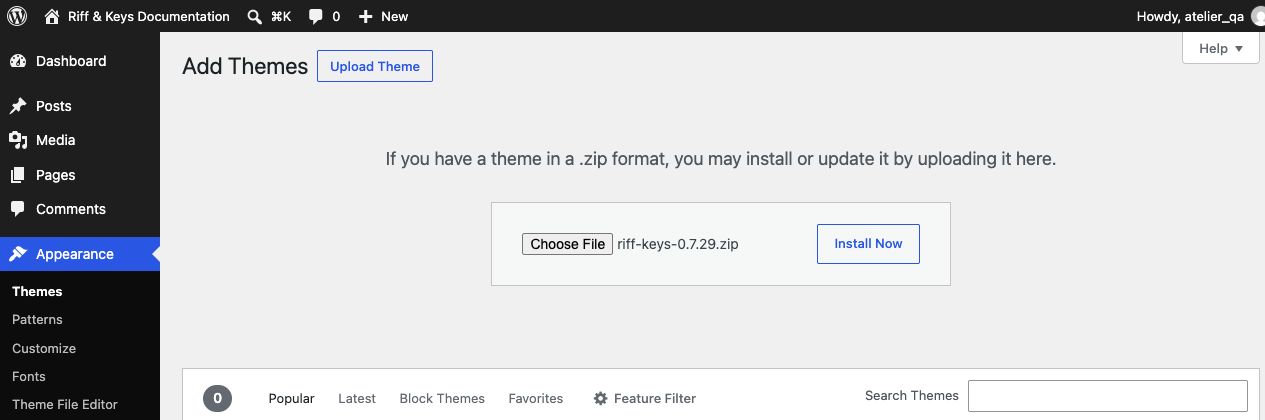
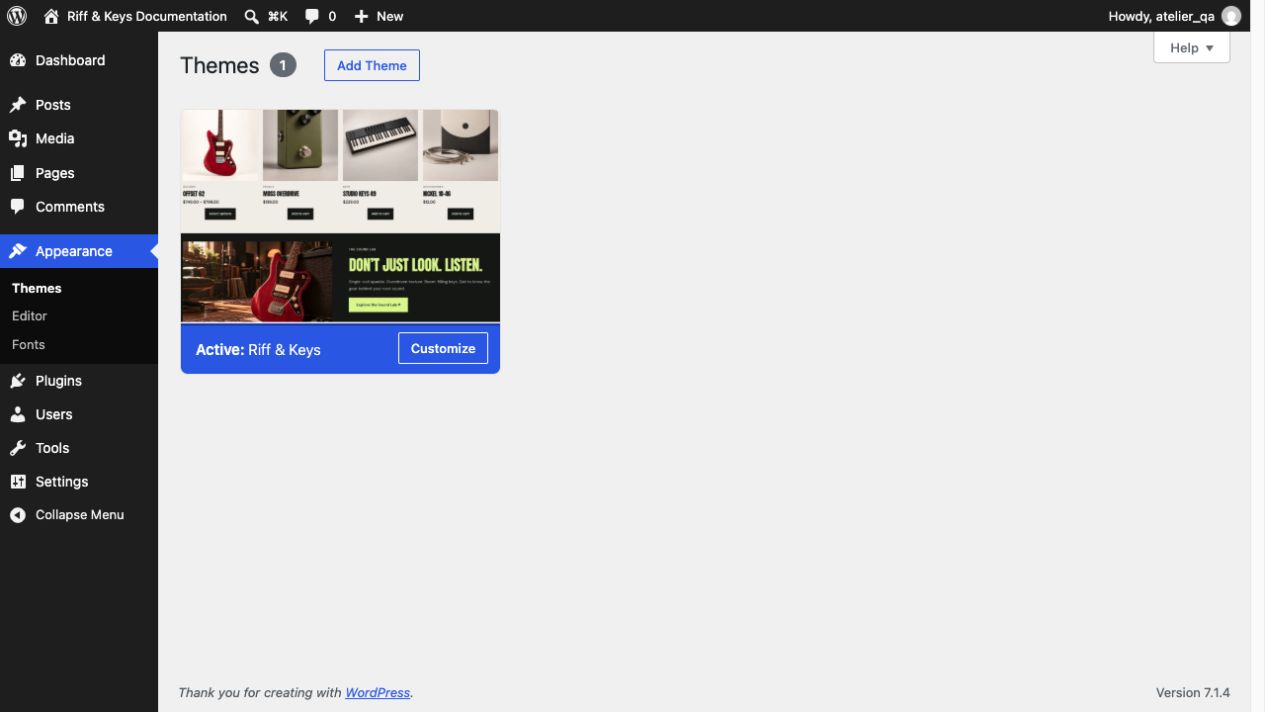
Theme and plugin ZIPs are installed through different screens. Do not upload a plugin ZIP through Upload Theme.
atelier-demo-import-1.3.0.zip, and click Install Now.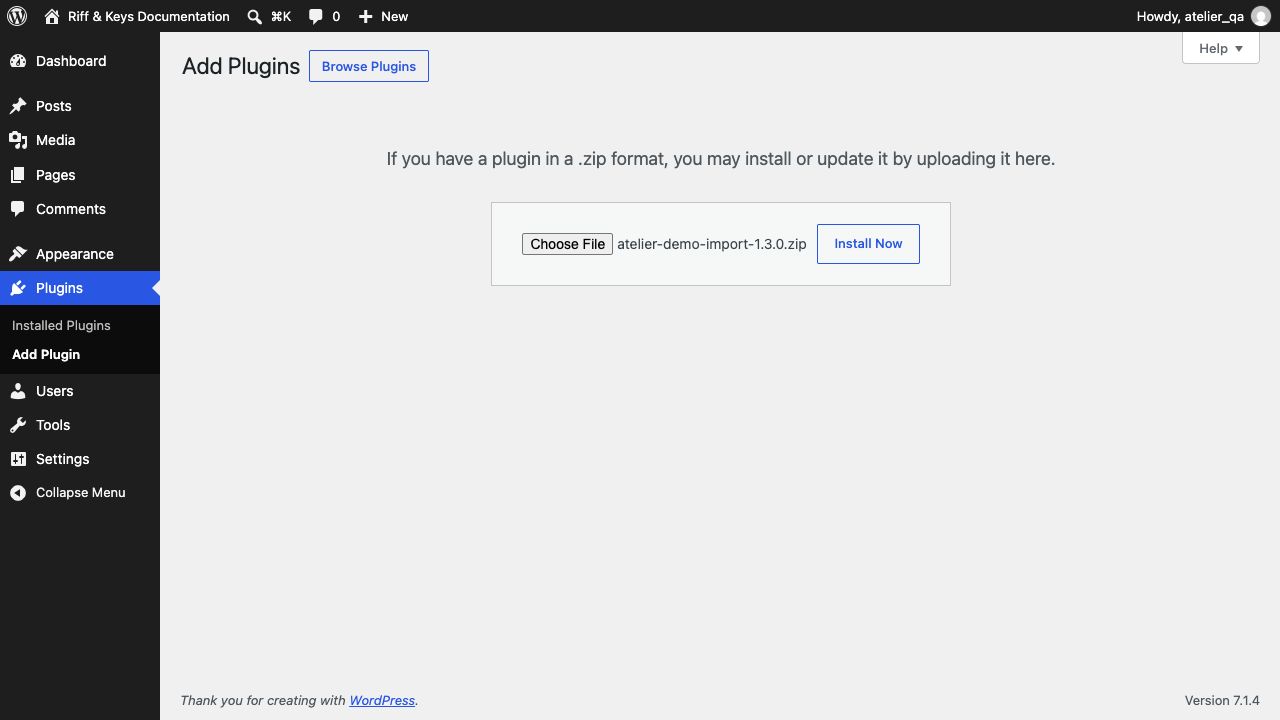
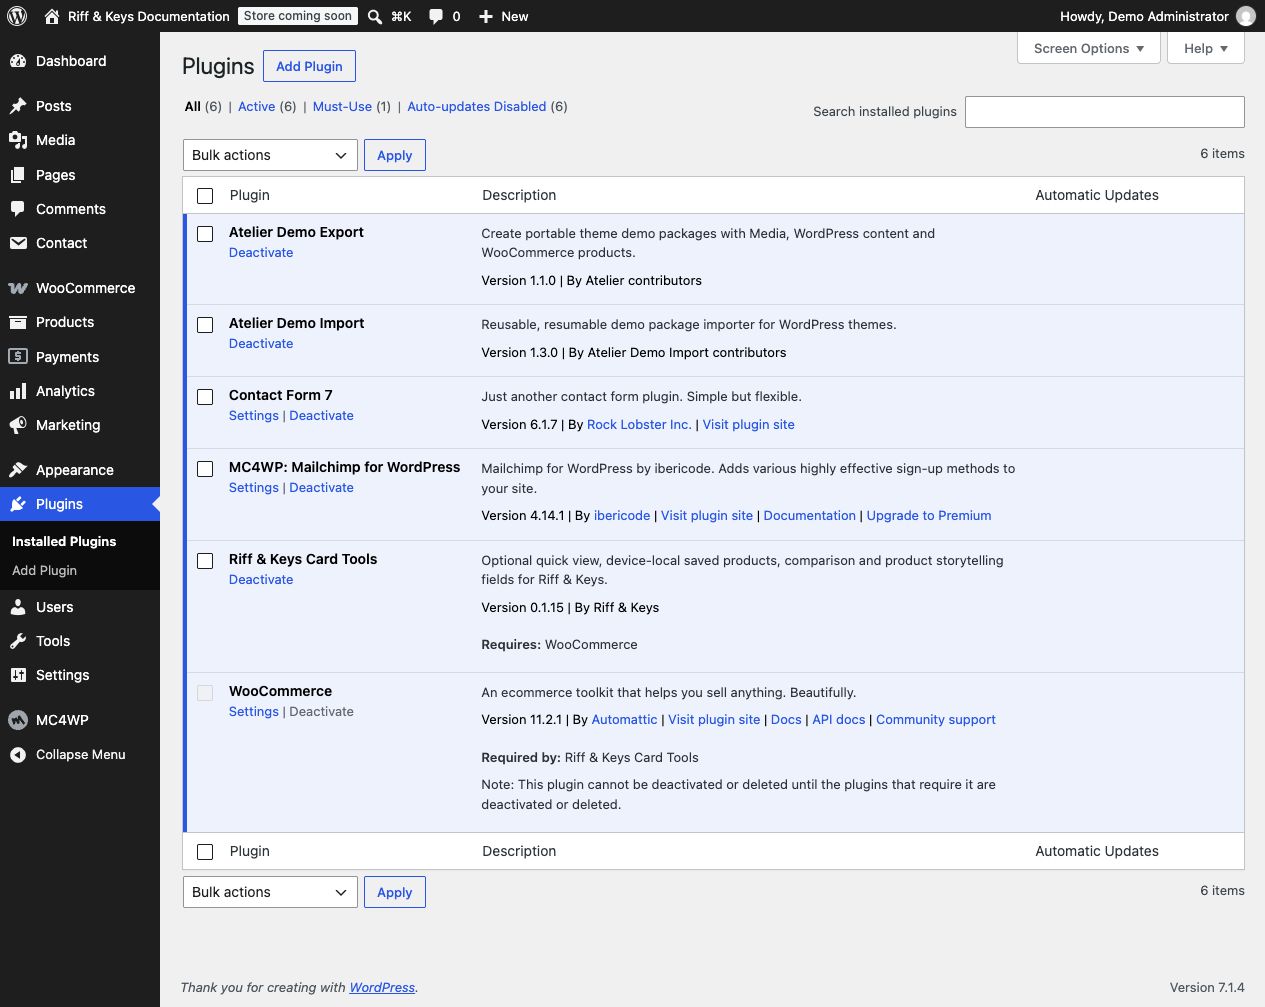
Third-party plugin installers and hosted service accounts are separate from the theme. The demo inspector reports the exact integrations required by the package you select.
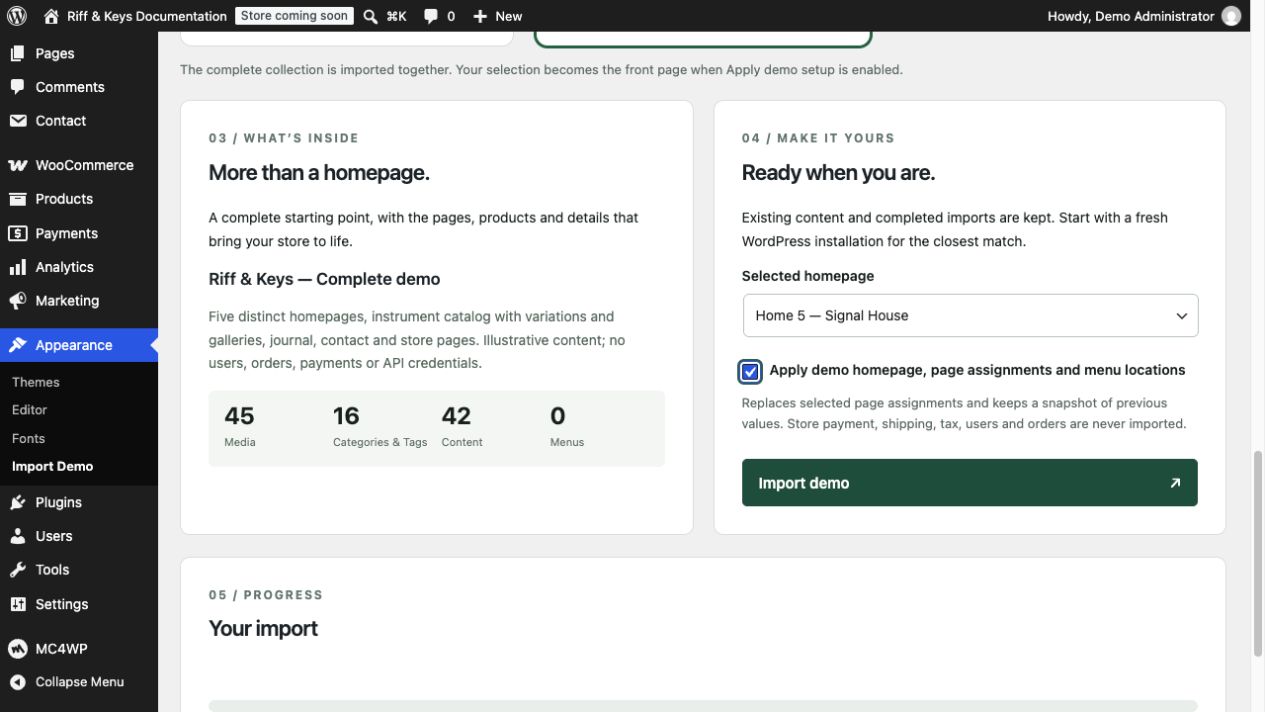
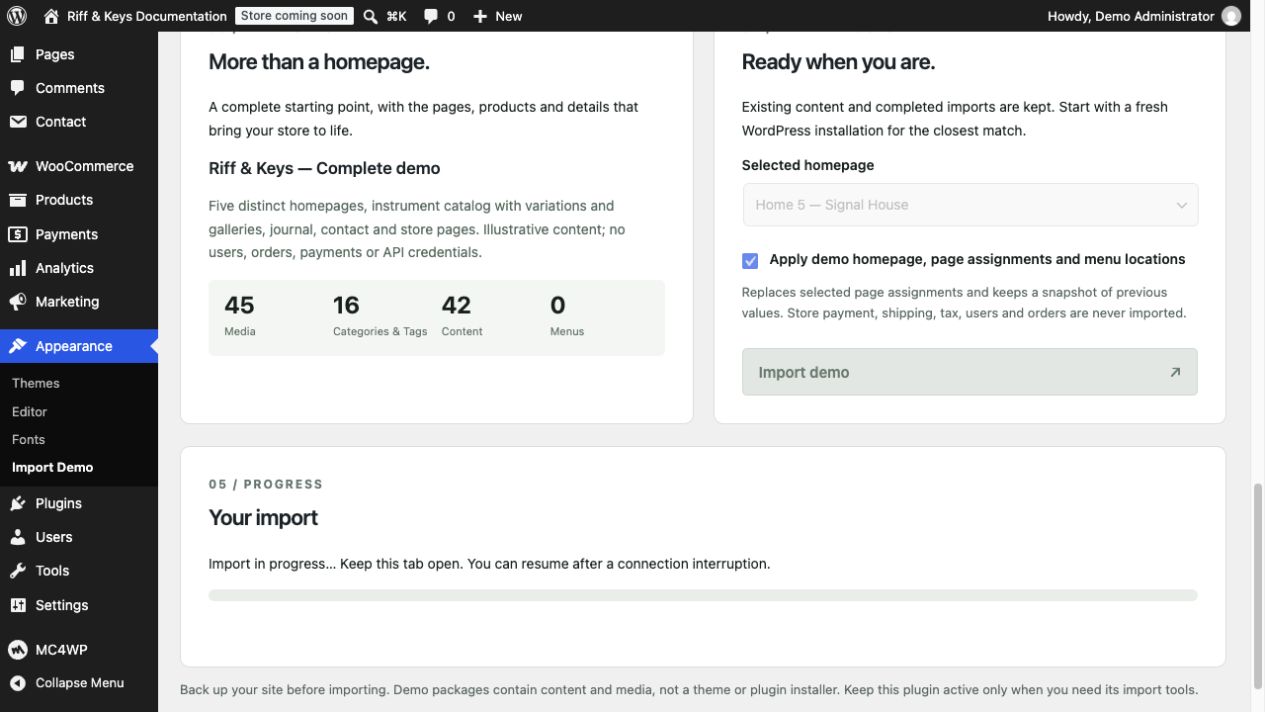
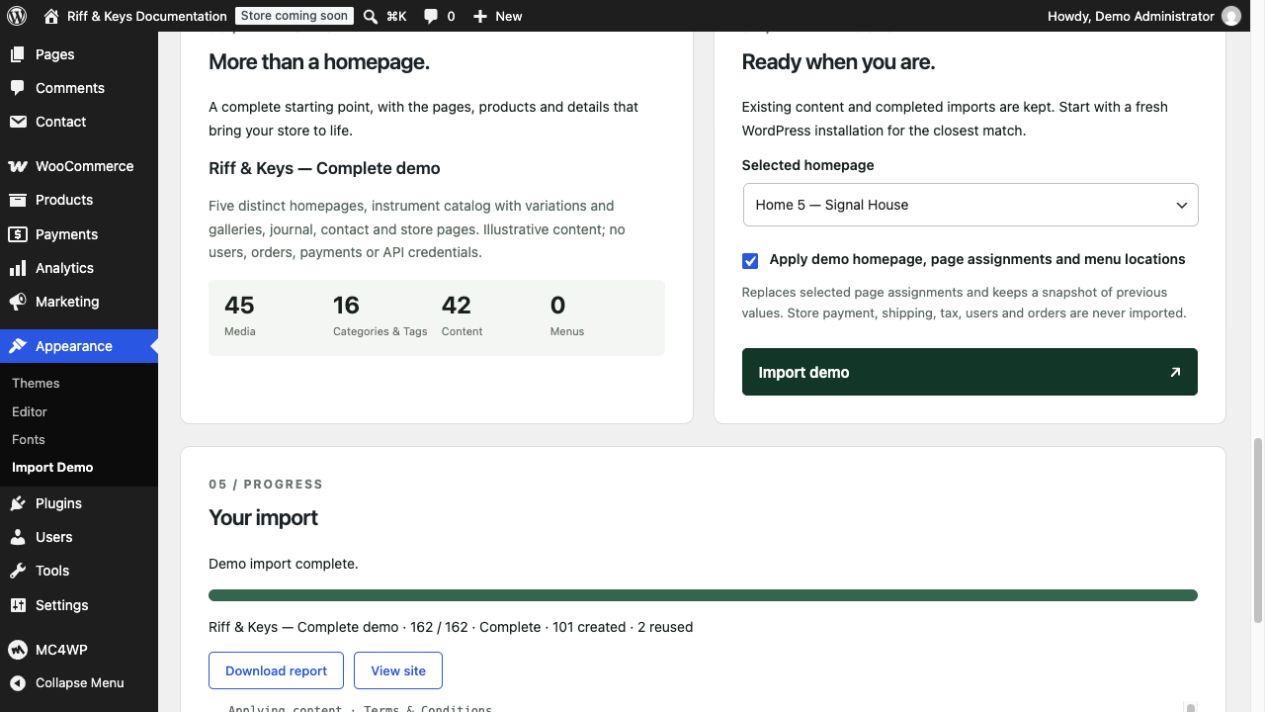
The entire collection imports together. If Apply demo setup is off, content is added but the current homepage and page assignments are retained. A snapshot is saved before opted-in setup changes.
Packages contain fictional content and Media, not customer accounts, orders, payment settings or service API keys. Counts may differ between package revisions; the inspector is authoritative for the ZIP you selected.
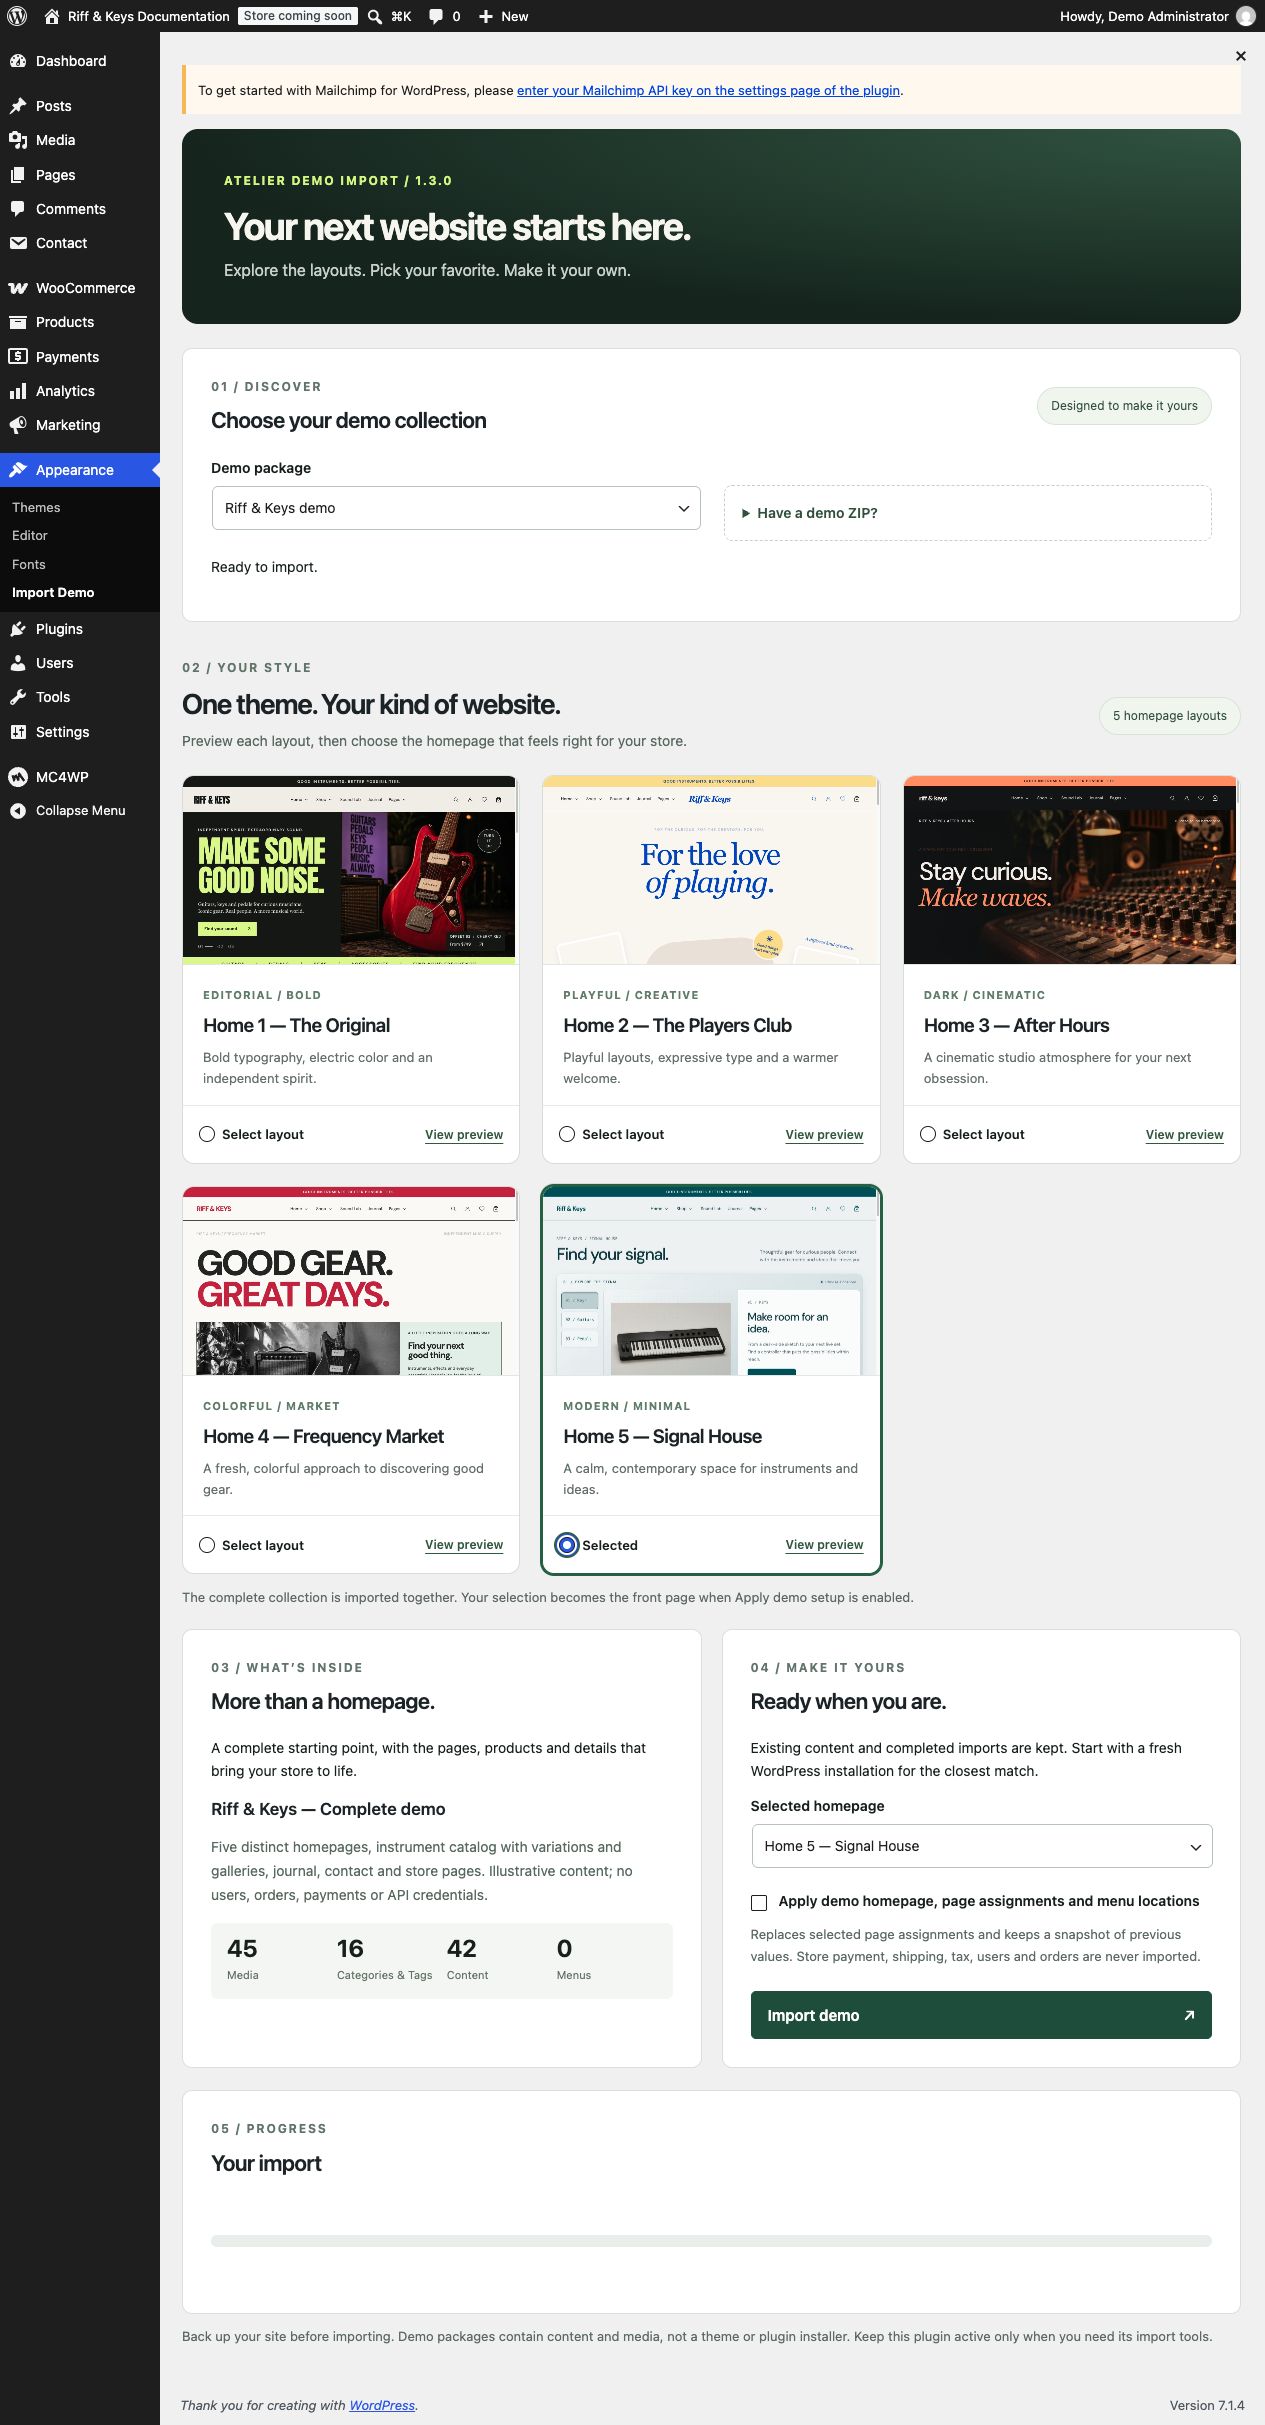
Editorial / Bold
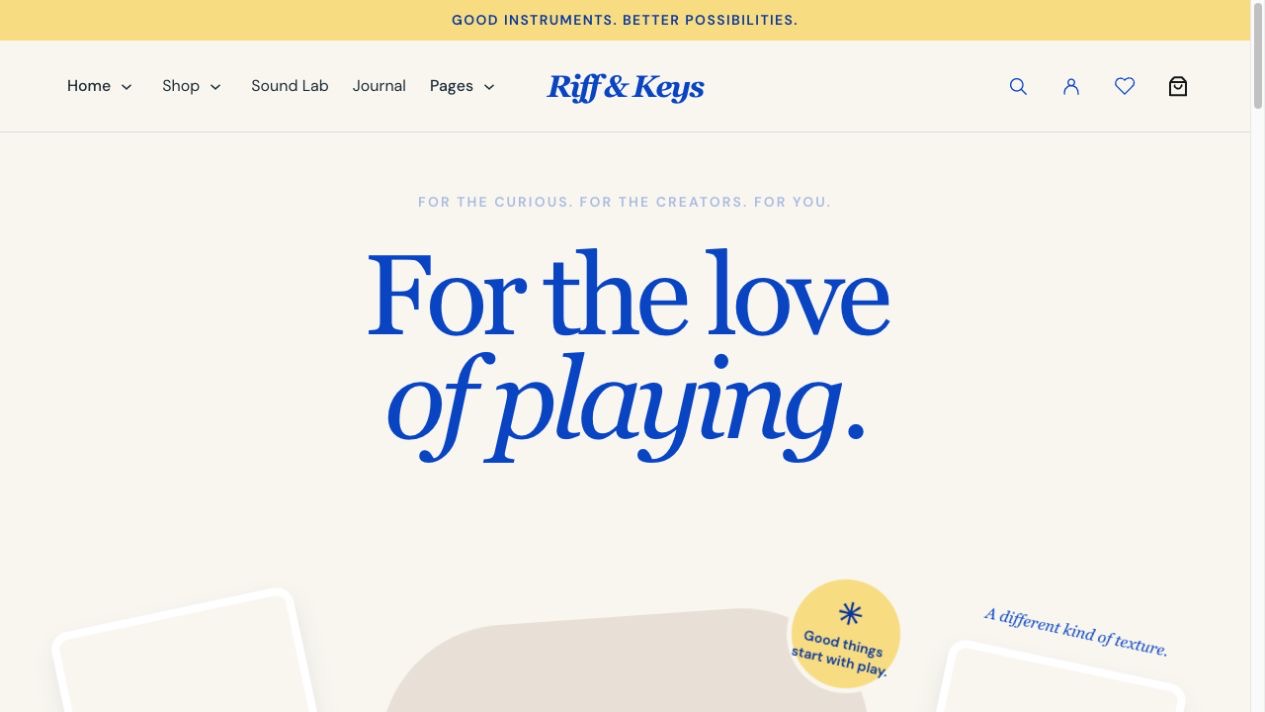
Playful / Creative
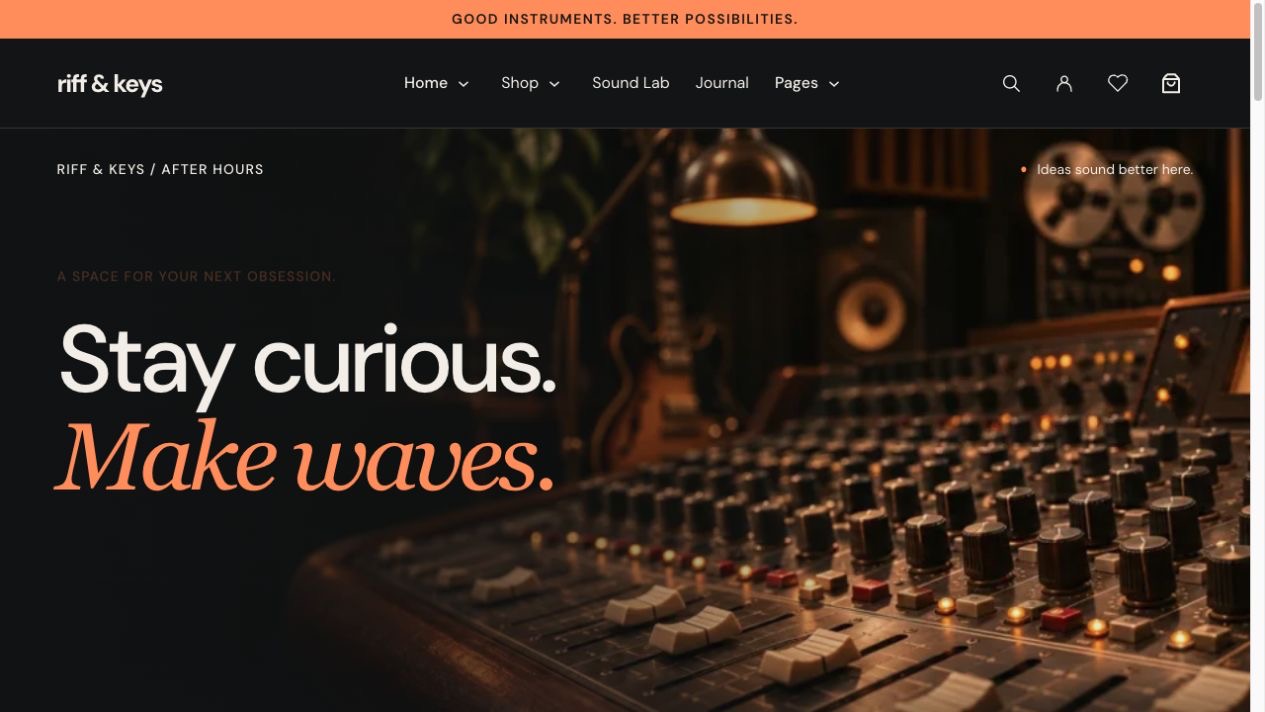
Dark / Cinematic
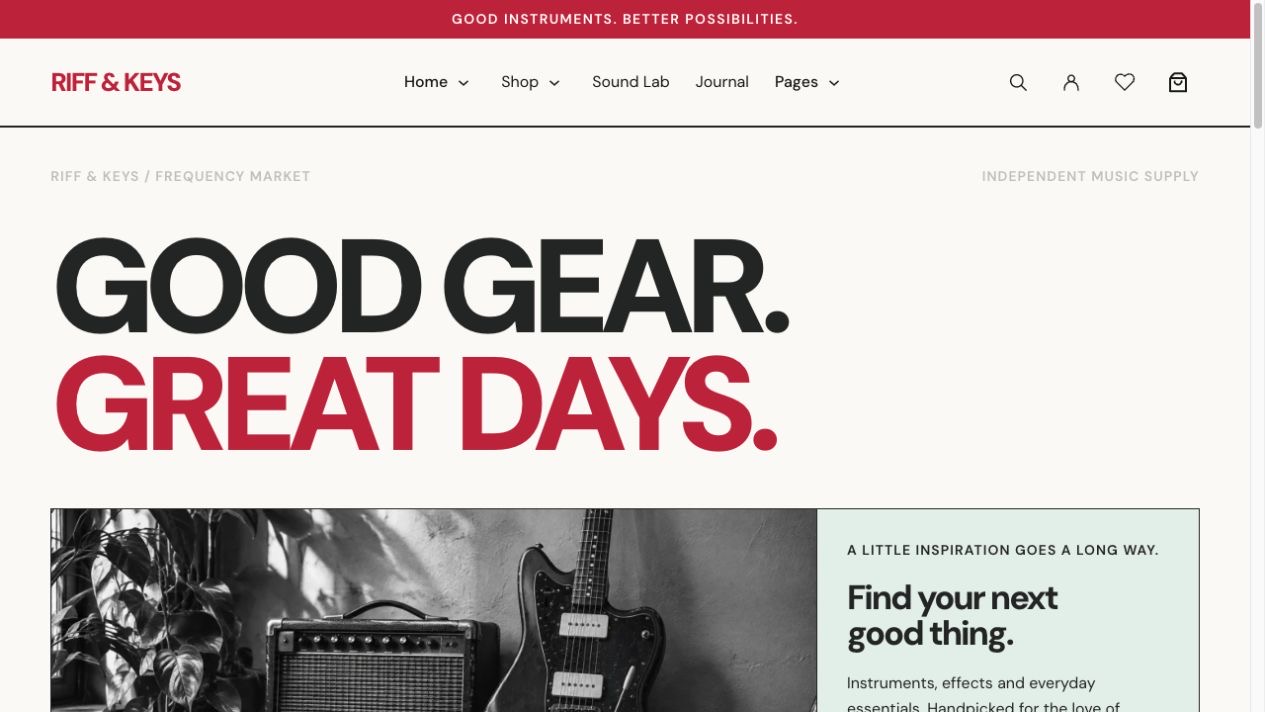
Colorful / Market
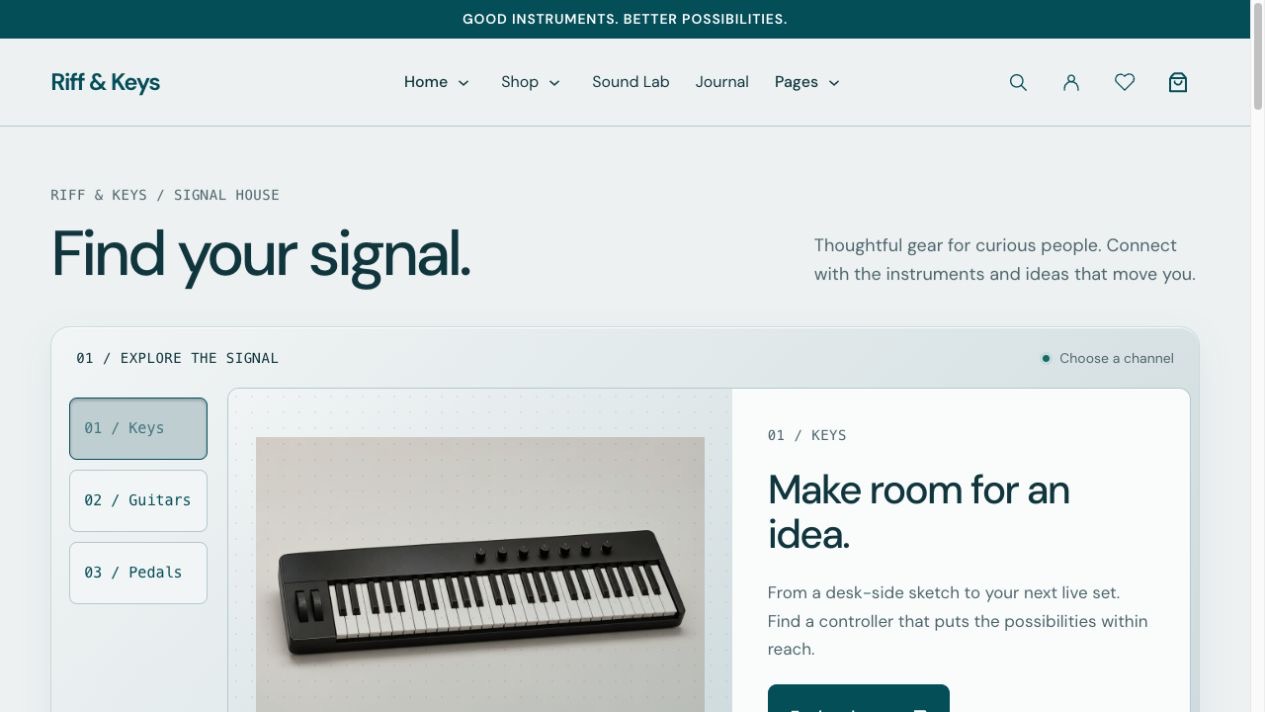
Modern / Minimal
| Homepage | Template | Where to edit the main layout |
|---|---|---|
| Home 1 — The Original | page-home-one / front-page layout | Appearance → Editor → Templates. Edit Home 1 or Front Page according to the active template. |
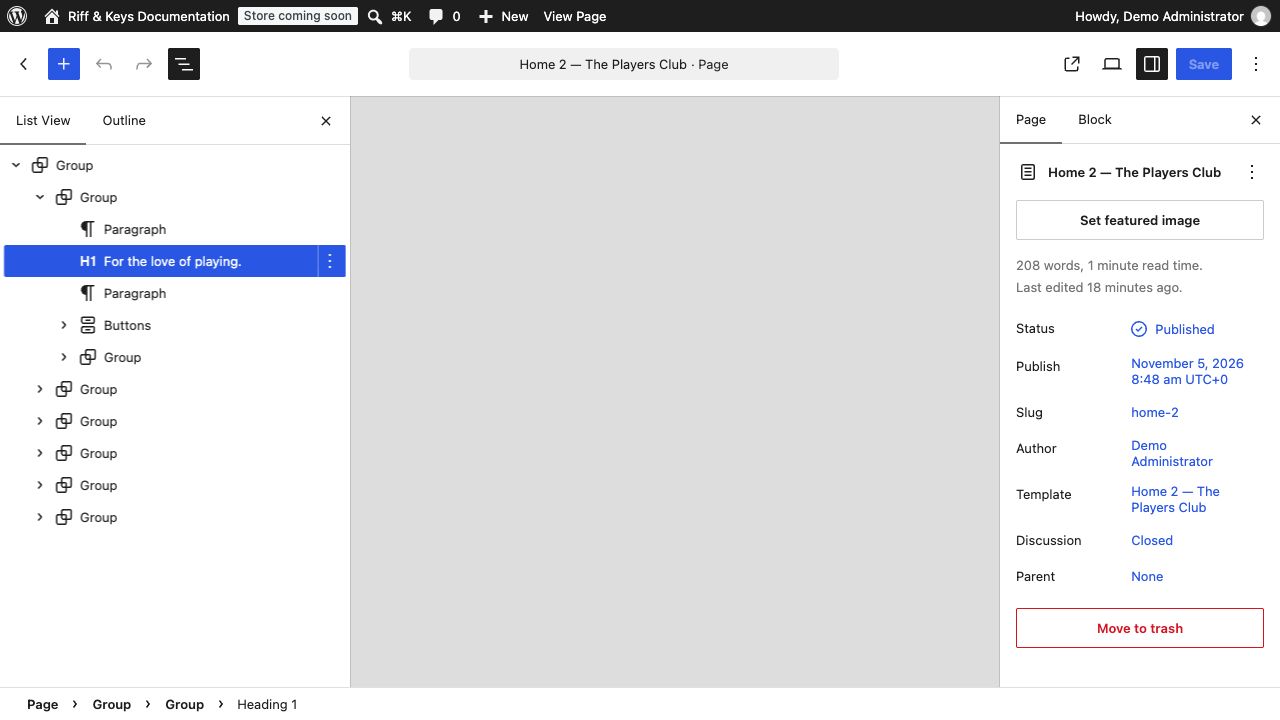
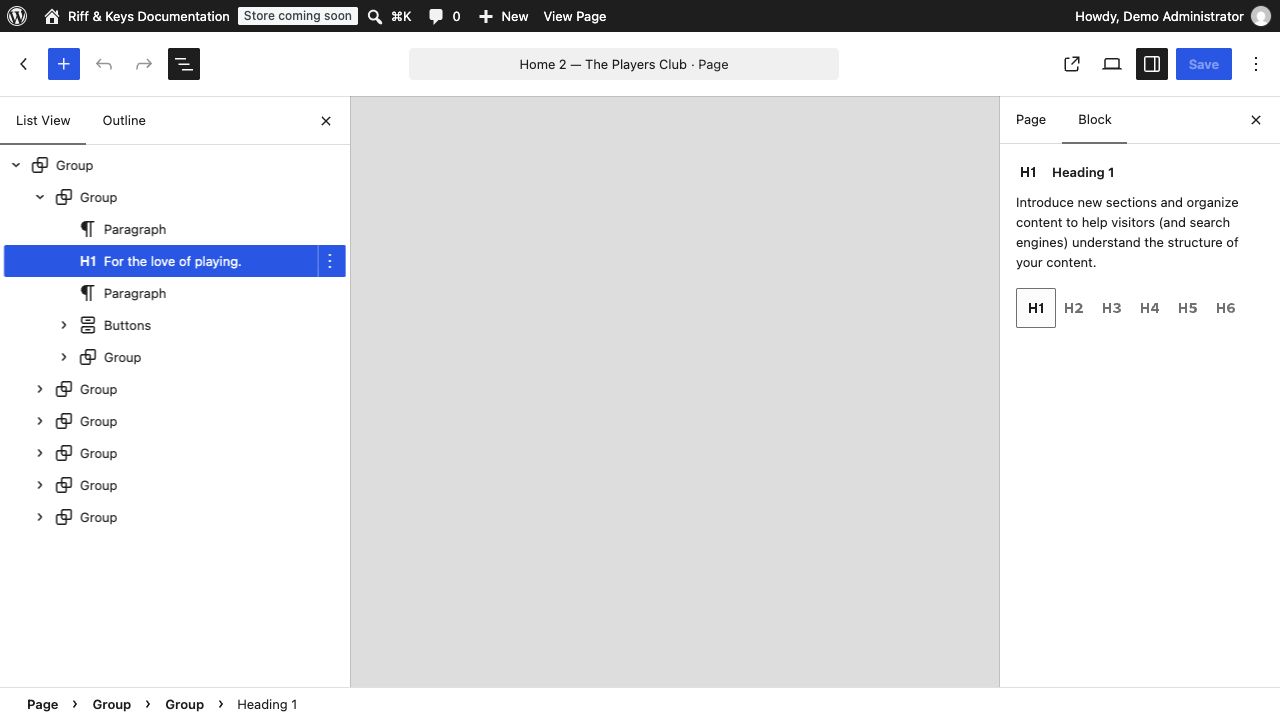
| Home 2 — The Players Club | page-home-two | Pages → edit Home 2. Its page content is displayed inside the matching template. |
| Home 3 — After Hours | page-home-three | Pages → edit Home 3. |
| Home 4 — Frequency Market | page-home-four | Pages → edit Home 4. |
| Home 5 — Signal House | page-home-five | Pages → edit Home 5. |
For a manual Home 2–5, create a page, choose its named template, insert the matching Riff & Keys pattern and publish. An empty page with only an alternate template selected will not contain the full pattern content.
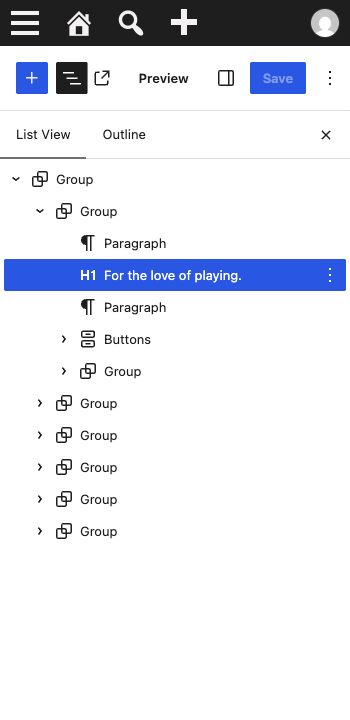
Its main sections are supplied by the template; editing the Home page body alone will not change those sections. Home 2–5 display page content, so their main blocks are edited in Pages.
Home 1 uses manual campaign controls; other layouts add their own motion and listening sections. Home 5 enhances three anchor-linked channels. Preserve rk-h5-channel-keys, rk-h5-channel-guitars and rk-h5-channel-pedals unless you update the matching selector links too. Effects respect the visitor's reduced-motion setting.
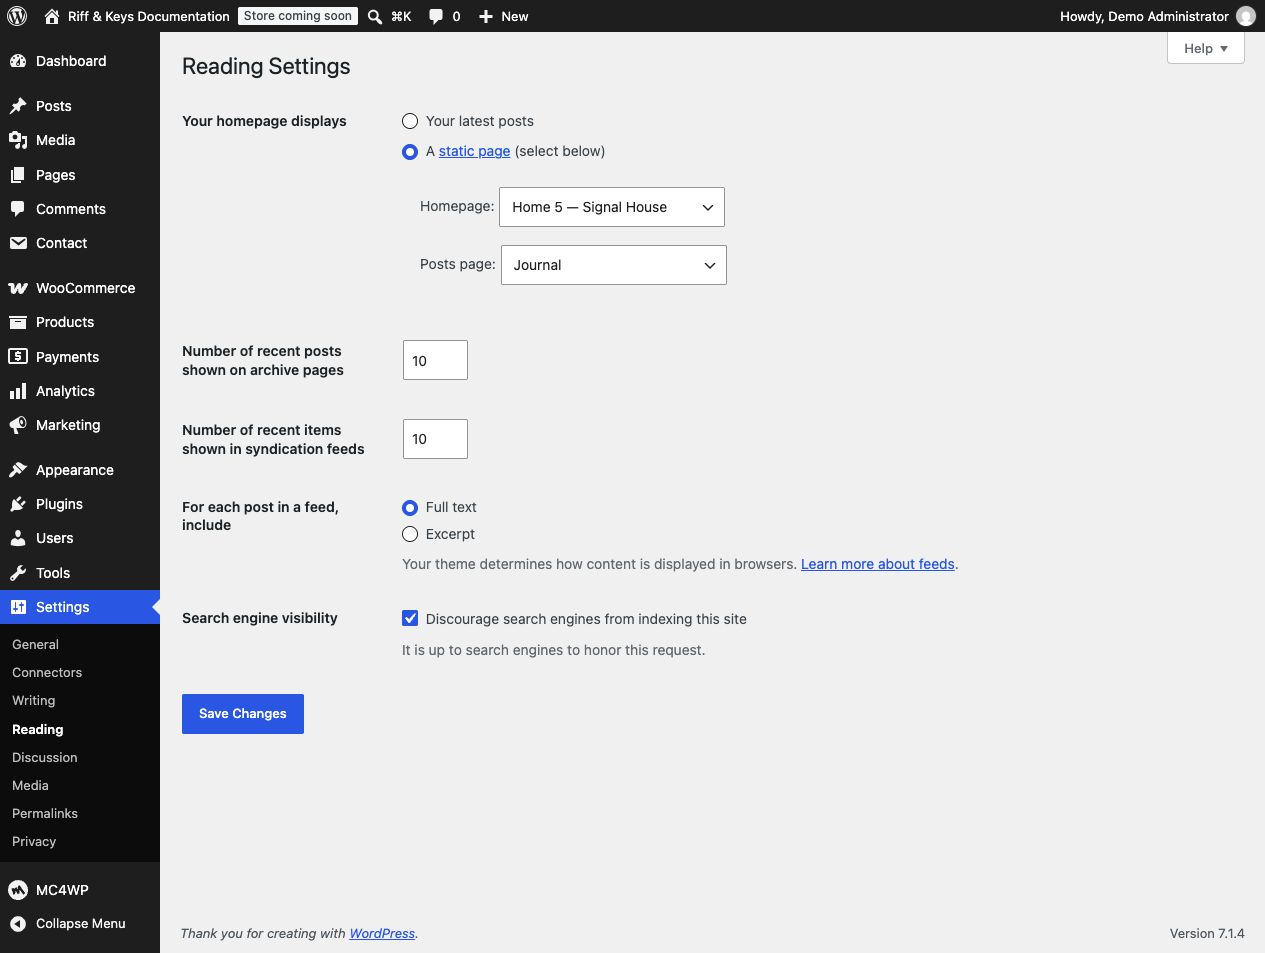
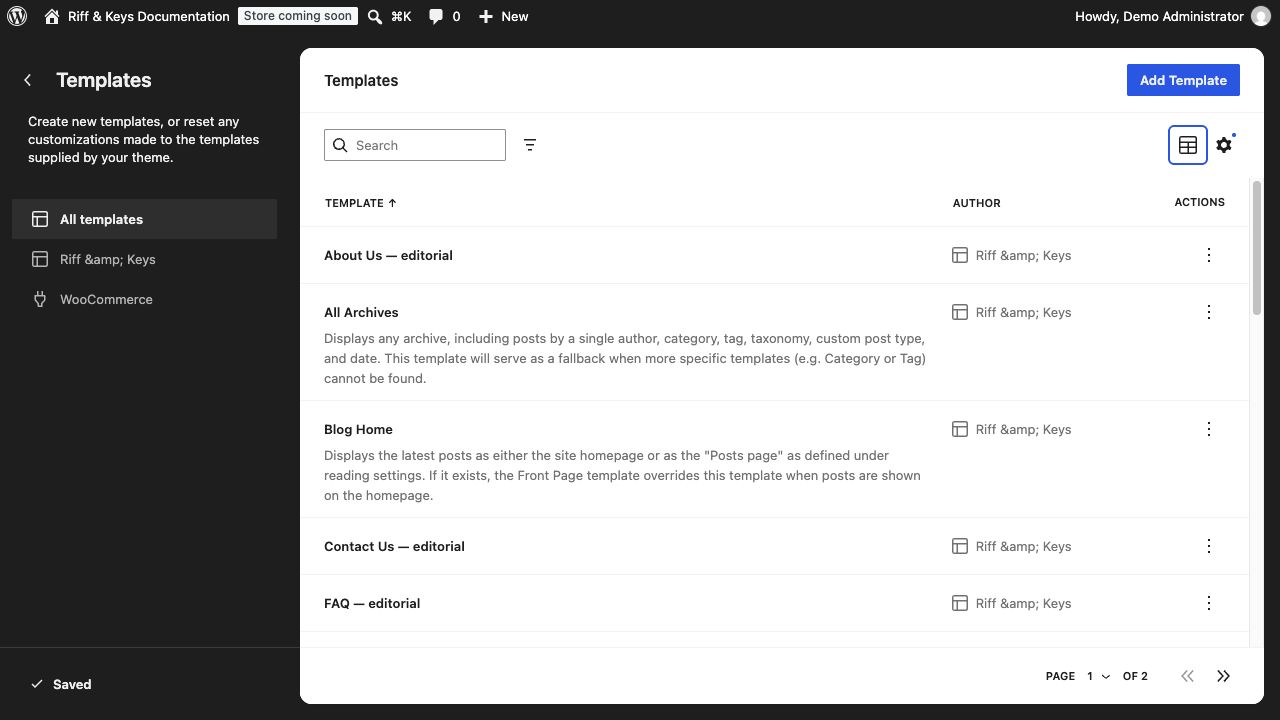
Use Appearance → Editor for templates, shared parts, navigation and global design. Use Pages and Posts for individual content. This distinction prevents editing the wrong level of the website.
| Item | Controls | Example |
|---|---|---|
| Page content | Blocks belonging to one page. | Home 3 text, About Us story. |
| Template | The layout surrounding a type of content. | Single Product, Product Catalog, Front Page. |
| Template part | Shared blocks used by templates. | Header, Footer, Mini-Cart drawer. |
| Pattern | A prepared group of blocks inserted as a starting point. | Home 4, Contact Us, policy layouts. |
| Styles | Global palette, typography and block defaults. | Brand accent, heading font. |
Keep supplied CSS classes and anchor IDs when changing content; some classes identify a layout or interaction. Use a child theme for PHP/CSS source changes. Saving content through WordPress does not require editing theme files.
Official introduction: WordPress Site Editor.
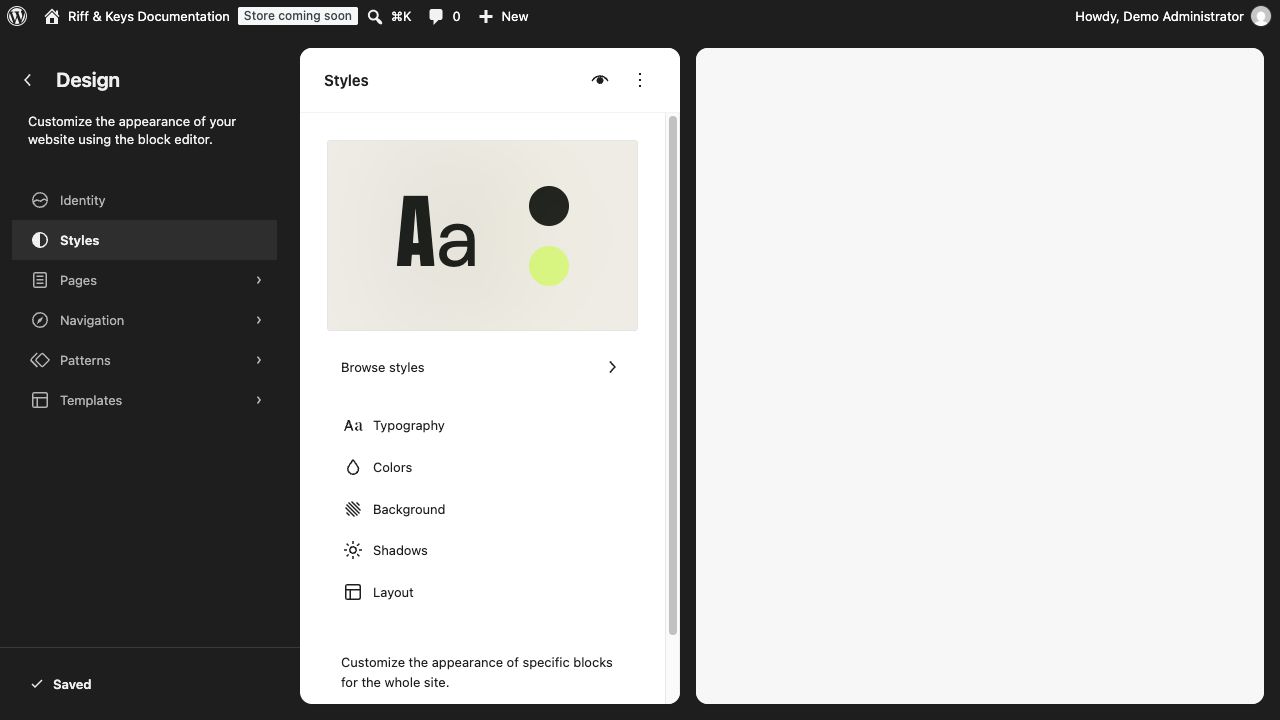
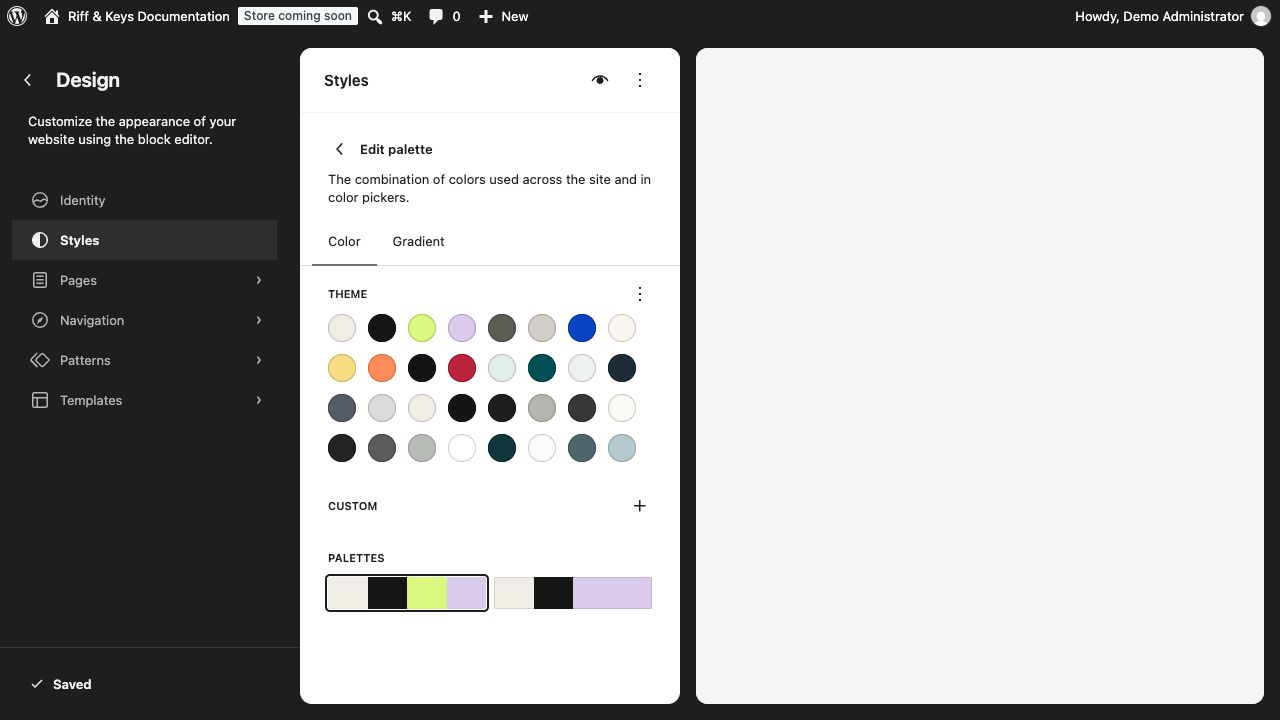
Product-photo canvases, some photographic overlays and stock/error indicators do not all use the brand accent. Changing one accent will not recolor every surface.
In Styles → Typography, choose Text and Headings fonts. Individual heading levels, Buttons, Navigation and Site Title can have their own typography controls. Available fonts include locally bundled Anton, DM Sans and RiffKeys Vietnamese, plus system serif/sans options. Changing a font may change wrapping; check long product names and mobile headings.
Edit the Header template part in the Site Editor. Select Site Title to change its presentation, or replace it with a Site Logo block and choose a logo from Media Library. Check its width and contrast on all five header presentations. Update the site name/tagline in Settings → General when appropriate.
Global Styles are easier to maintain than editing many individual block colors. Save custom source-code changes in a child theme rather than the distributed parent.
Use Media Library references instead of pasting a URL into a theme file. Upload real merchant photography for the products you sell. Keep consistent aspect ratios within a product gallery, leave some room around the instrument, and avoid heavy baked-in borders. The product gallery preserves the whole product; differing image backgrounds may still remain visible.
Replace Audio and Video blocks in the owning page/template, including poster artwork where used. Some product sections use Card Tools URL fields instead of native page blocks; copy the file URL from Media Library into the matching field. Supported playback depends on browser codecs and server MIME support.
Demo tones are illustrative synthesized examples, not recordings of actual advertised products. Replace them with accurate recordings or retain the illustrative label. Audio should start only after visitor interaction. Preserve native playback controls and supply descriptive text for the content.
During migration, transfer Media files and the WordPress database consistently. A working-looking block that points to an old hostname can fail once the old website is removed.
The storefront uses WooCommerce prices, stock and validation. Simple/variable Add to cart requests use AJAX where supported by the supplied forms and open the cart drawer after success. Variation selection is also available in Quick View with Card Tools. Test other product types and extension-provided forms separately.
Use supported simple/variable products and local product attributes. The current demo schema rejects global taxonomy attributes, downloadable and other unsupported product kinds rather than silently flattening them. This is an export limitation, not a general statement about WooCommerce storefront capabilities.
Official walkthrough: WooCommerce variable products.
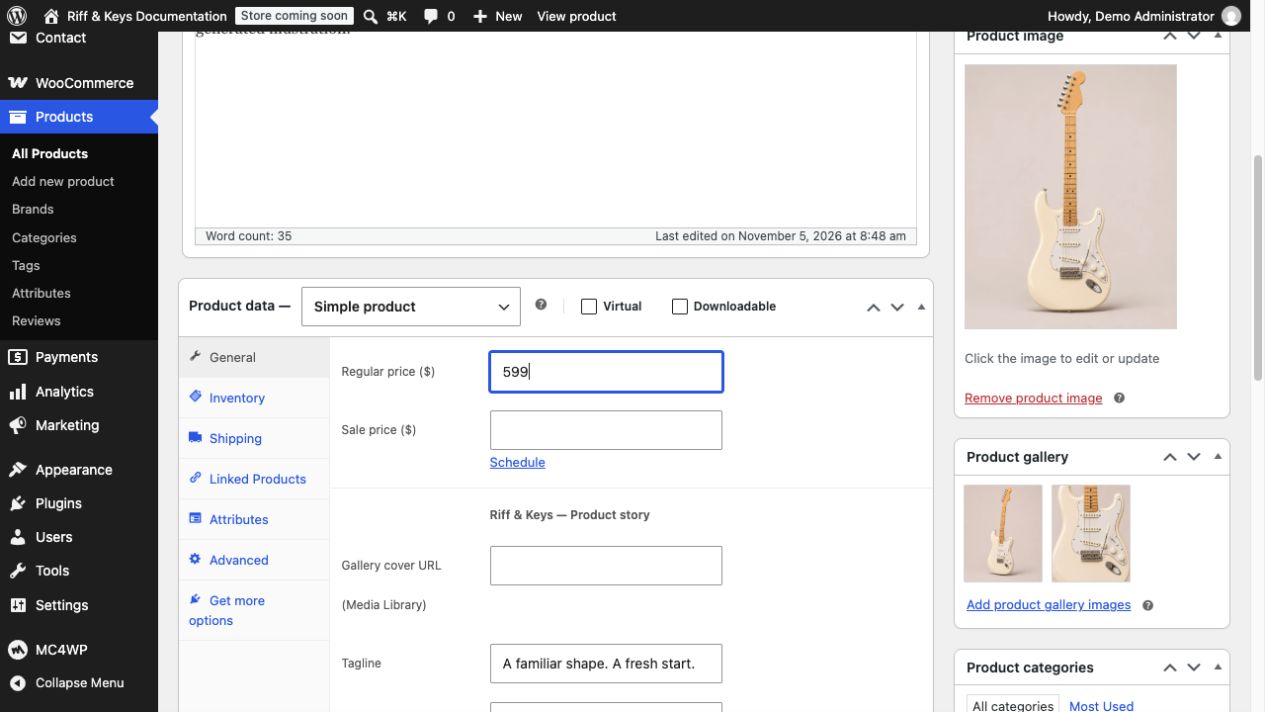
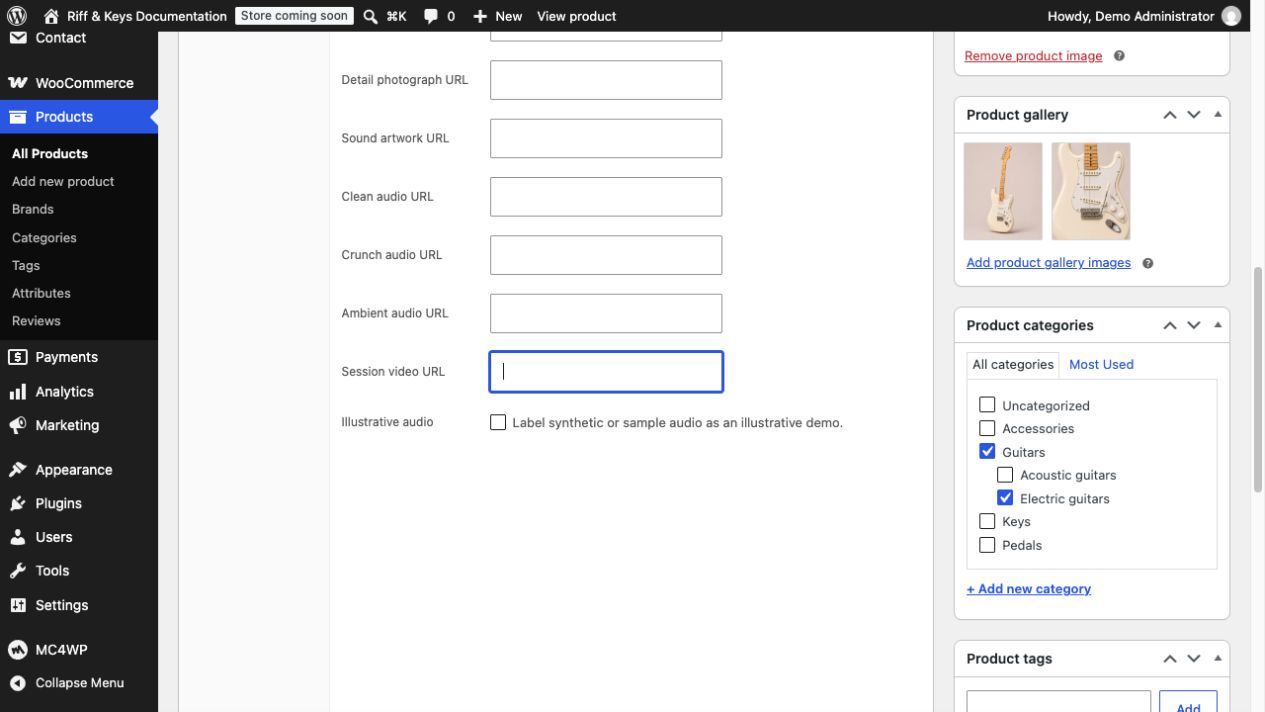
Activate RiffKeys Card Tools to enable the supplied wishlist, comparison, quick-view and editorial fields. In the classic WooCommerce product editor, find Product data → General → Riff & Keys — Product story. The current fields are rendered in that form; a different product editor may not expose them in the same place.
| Field | Use |
|---|---|
| Gallery cover URL (Media Library) | Optional presentation cover used by companion product displays. |
| Tagline | A short editorial line introducing the product. |
| Detail photograph URL | Detail imagery in the product editorial layout. |
| Sound artwork URL | Artwork/poster for the listening section. |
| Clean / Crunch / Ambient audio URL | Media Library file URLs for the supplied sound samples. |
| Session video URL | Video media used by the product session area. |
| Illustrative audio | Label sample/synthesized audio as illustrative. |
Save the product after changing fields. Specifications still come from native WooCommerce attributes; the story fields do not replace product price, stock or variation data.
Deactivating Card Tools removes its optional controls without deleting native WooCommerce products or orders. Describe browser storage behavior in your store's privacy information.
Let WooCommerce create its functional store pages. Confirm Shop under WooCommerce → Settings → Products and Cart, Checkout, My Account and Terms under WooCommerce → Settings → Advanced, where available in your version. Publishing a page with a familiar title alone does not assign it to WooCommerce.
| Area | Edit / manage |
|---|---|
| Shop and category archives | Site Editor Product Catalog/archive templates; product content under Products. |
| Filters and catalog choices | WooCommerce filter/Product Collection blocks and real categories, attributes, brands and prices. |
| Cart / Checkout | The assigned pages with native WooCommerce Cart/Checkout blocks. Preserve their functional inner blocks. |
| My Account | The assigned page using [woocommerce_my_account], plus WooCommerce account settings. |
| Order Received | The WooCommerce order confirmation endpoint/template. It is generated from an order, not a manually created Thank You page. |
Grid/List controls and category/brand filtering use the theme's catalog presentation. For a Brand filter, populate and assign the brand taxonomy supported by your WooCommerce installation. If products are missing, check publication, catalog visibility, stock settings and the current query/filter first.
The theme supplies presentation, not payment accounts, shipping rates, tax rules or a live delivery service. Keep Cart, Checkout and My Account out of full-page caching. Test payment/checkout extensions on staging before activating them on a trading store.
In Pages → Add New, choose the matching template in page settings and insert the appropriate pattern from the Riff & Keys pattern category. Publish, then add it to navigation or assign it in the relevant WordPress/WooCommerce setting.
| Page | Template | Content |
|---|---|---|
| About Us | About Us — editorial | About Us pattern; replace story, images and business claims. |
| Contact Us | Contact Us — editorial | Contact pattern and your CF7 form. |
| FAQ | FAQ — editorial | FAQ pattern; edit native Details questions/answers. |
| Sound Lab | Full width — no page title | Sound Lab pattern and your recordings. |
| Wishlist | Wishlist — editorial | Wishlist pattern with Card Tools active. |
| Privacy, Terms, Shipping, Refund & Returns | Store policy — editorial | The matching policy pattern, rewritten for your business. |
The Journal page body is not the source of the posts-index layout. Search Results and 404 also use templates; they do not need normal pages with those titles. Replace all example contact details, policy promises, shipping times, addresses and fictional reviews before launch. The supplied policy copy is demo content, not a completed policy for your store.
demo_mode: on and a fake .example recipient; remove demo mode only when real delivery is configured.A frontend success message alone does not prove inbox delivery. Check the form plugin, mail provider and spam/delivery logs if messages do not arrive. Do not paste SMTP credentials into theme templates or demo content.
Official reference: Contact Form 7 — setting up mail.
The demo includes no real API key or audience connection. When no configured connection is available, the supplied footer can show a Journal fallback rather than pretend that a signup succeeded. The theme does not supply a mailing service or create a Mailchimp account.
Official connection guide: MC4WP — connect your Mailchimp account.
The theme's text domain is riff-keys, with a POT file under languages/. Card Tools, Import and Export have their own domains/catalogs. Use a translation tool such as Poedit or Loco Translate, and store translations in a persistent WordPress language location so updates do not remove them.
WordPress/WooCommerce/CF7/MC4WP translations are separate. Also translate page content, navigation labels, already inserted patterns, product descriptions and policy text: changing the site language does not rewrite authored content.
RiffKeys Vietnamese is a bundled, renamed Noto Sans derivative used for Vietnamese body text/fallback coverage. Check all custom font choices with your actual language. Local theme fonts do not require a remote Google Fonts request.
Customers can skip this chapter. Atelier Demo Export runs on your source demo site and is not required by customers importing the resulting ZIP.
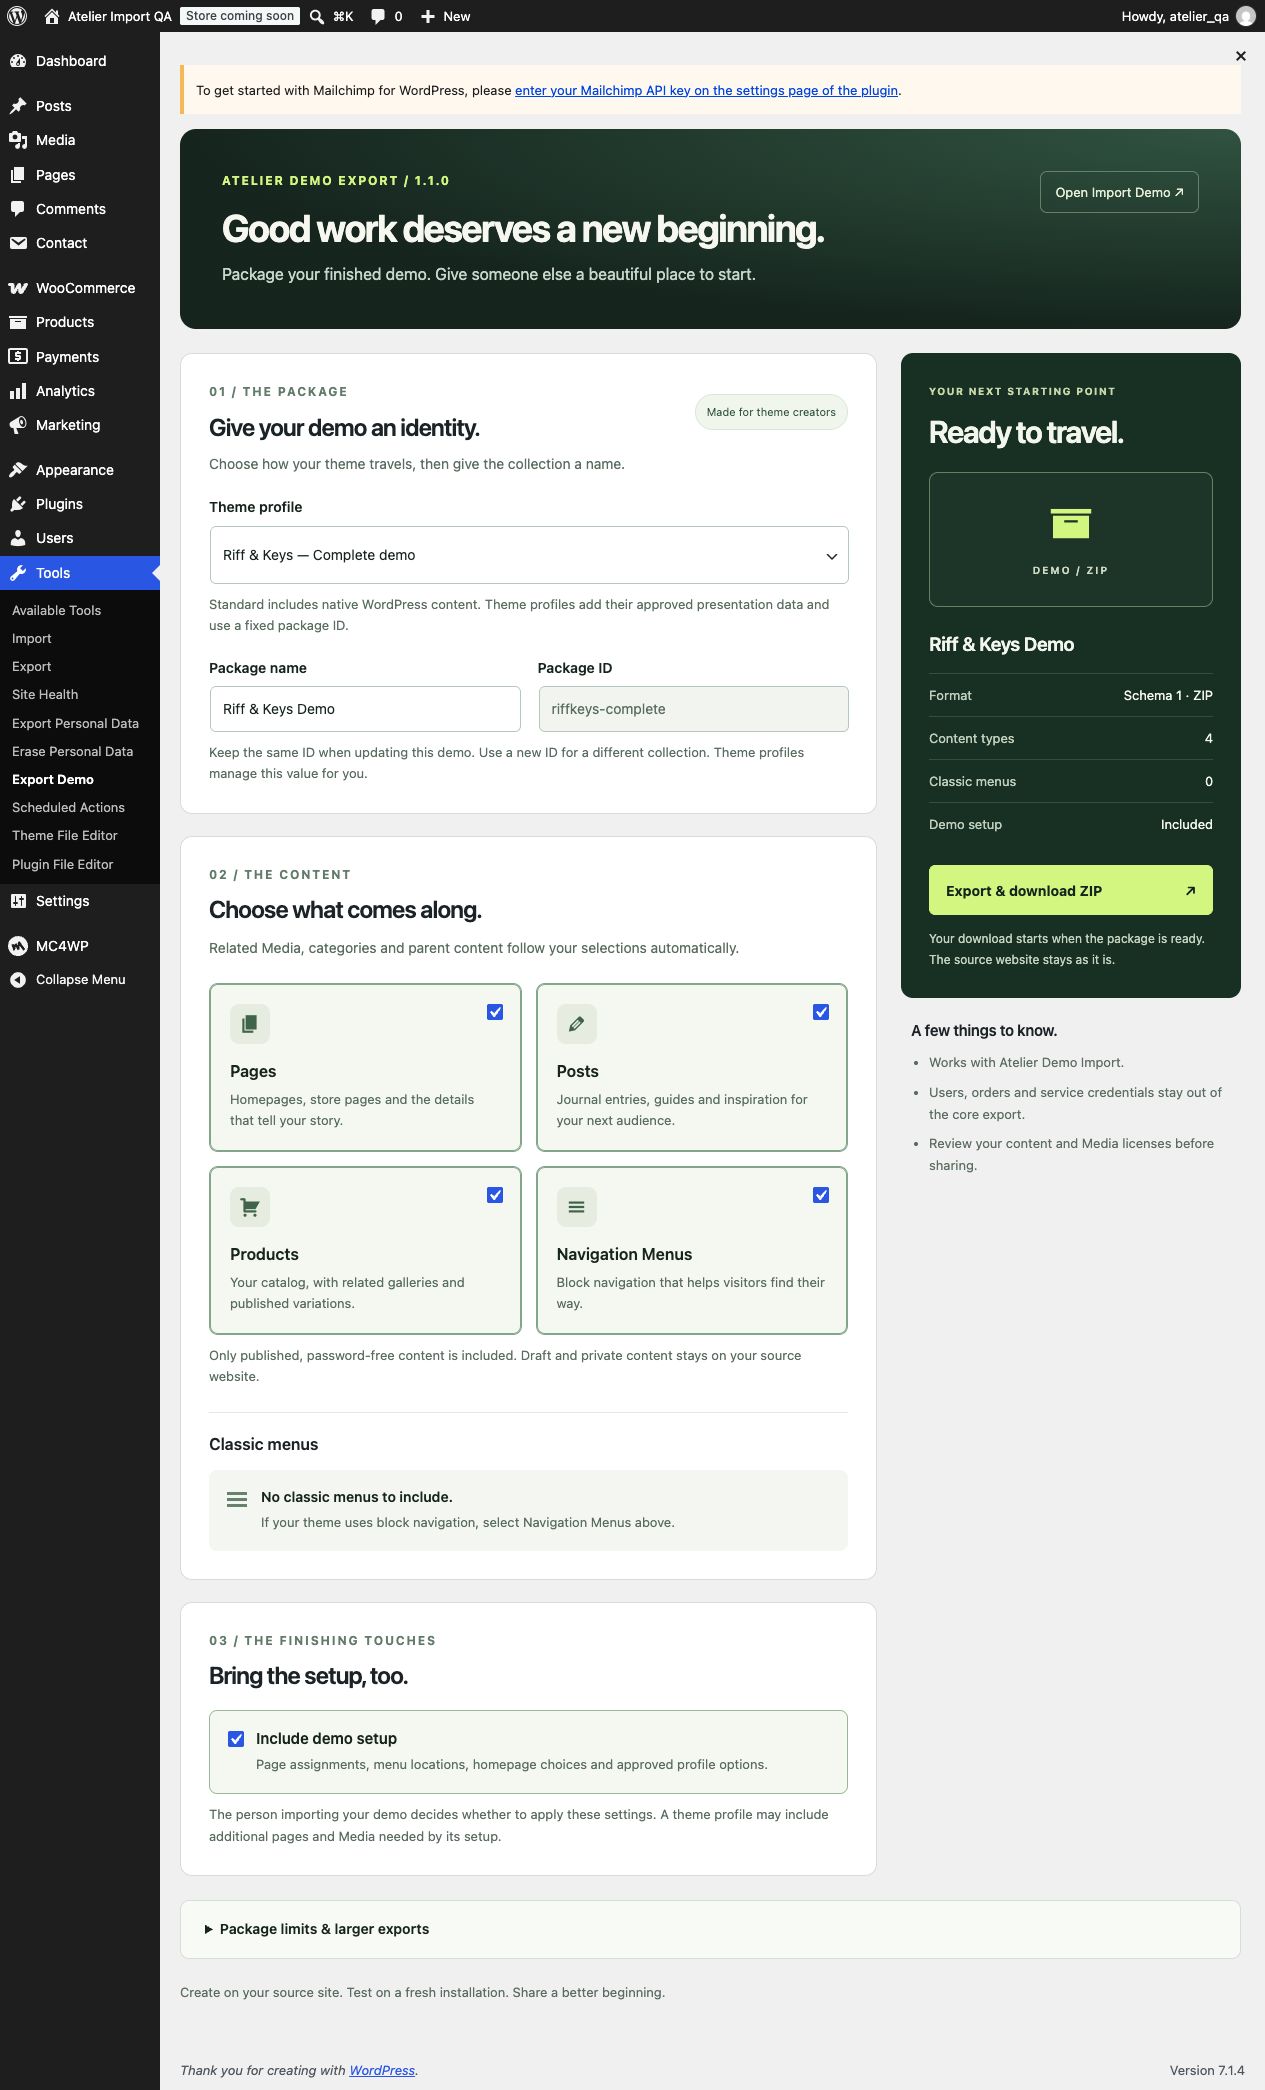
The core excludes users, orders, coupons, reviews and service settings. Authored content and original Media are included as-is, so review their privacy and redistribution rights. The Riff & Keys profile supplies safe demo form configuration without real recipients, audience lists or API keys.
Current export limits are 2,400 objects, 240 MB Media total, 25 MB per Media file and a 10 MB manifest. A source library over 10,000 attachments is rejected. Media must be in local uploads. This schema does not automatically export every page builder, custom field, global product attribute or product type.
wp atelier-demo export /absolute/path/riffkeys-demo.zip --profile=riffkeys
wp atelier-demo export /absolute/path/blog.zip --types=post --skip-settings
Do not overwrite an existing ZIP path. Full profile/adapter authoring details are in atelier-demo-export/docs/EXPORT.md; preview metadata and the import schema contract are documented in the Import plugin's developer guide.
Saved Site Editor templates, template parts and Global Styles live in the database and take precedence over supplied theme files. A theme update may therefore leave a customized layout unchanged. Compare/export your edits before using a template's reset/clear-customizations action; that action discards the saved customization for the selected item.
Keep custom PHP/CSS source work in a child theme. Do not assume a theme update backs up overwritten parent files. Demo reimport is not required for a visual/code update and does not function as an overwrite/sync tool.
Transfer the database and Media together using a suitable migration workflow. Update stored source-domain URLs with a WordPress-aware tool, verify HTTPS and save Permalinks if routes need refreshing. Check navigation, product/gallery media, CF7 shortcode references, Mailchimp connection and WooCommerce page assignments after the move. Do not include live credentials in a demo ZIP.
For the Atelier split, upgrade Import to 1.3.0 or later before activating standalone Export alongside it. Existing demo ZIPs remain valid; customers do not need Export. Automatic update/license services are not supplied by these files; follow the distribution channel's update instructions.
The theme includes conditional assets, responsive Media delivery and progressive motion. Keep these working by testing optimization changes against actual store interactions.
Local test scores are not a guarantee of hosting performance. Measure your own homepage LCP, layout shifts and responsiveness after replacing images and adding services. Optional local development cache tooling is not a requirement of this theme and should not be copied to another server without its own configuration.
| Symptom | What to check |
|---|---|
| Theme upload says style.css is missing. | Use the installable theme ZIP, not the complete kit, a plugin or the demo data ZIP. |
| No demo collection is listed. | Activate the matching theme and upload the demo content ZIP through Have a demo ZIP? A registered local package is optional. |
| A homepage card has no screenshot. | Use the theme version containing preview assets and check that its image URLs are reachable. Text-only cards still select a layout. |
| Import reports missing plugin/content type. | Activate the named integration and inspect again. Do not ignore preflight errors. |
| SKU conflict prevents import. | The source product already exists outside this package's identity. Use a clean demo site or revise the source package deliberately. |
| Import stops or cannot move a Media file. | Check connectivity, upload size, PHP time/memory and WordPress uploads permissions with your host. Reopen and Resume the saved job. |
| Selected card did not change the front page. | Apply demo setup may have been off. Assign the published page in Settings → Reading. |
| Home 1 page edits do not appear. | Edit the active Home 1/Front Page template; its sections are template-supplied. |
| Home 2–5 is mostly empty. | Choose the matching template and insert its page pattern/content. |
| An update does not change the header/template. | Check saved Site Editor overrides first, then caches. Back up before resetting a customized part. |
| Wishlist, Compare or Quick View is missing. | Activate Card Tools, publish/assign the Wishlist page as appropriate and check script/optimization conflicts. |
| A variable product cannot be added. | Select every required option, ensure a matching enabled variation has a price and purchasable stock, and inspect WooCommerce's error. |
| Contact form is not delivering. | Check demo mode, real recipient/sender, provider configuration and delivery logs. |
| Newsletter shows Journal instead of signup. | Connect MC4WP, select its audience and check that the published form is correctly configured. |
| Changed colors do not affect an alternate Home. | Change that Home's named palette roles, and inspect any saved block-level color overrides. |
| New export plugin says it is paused. | Update the older combined Import to at least 1.3.0, or deactivate it on the source site. |
| Export is too slow through the browser. | Check the package bounds and server limits, reduce the source collection or use the documented WP-CLI export. |
Include theme/plugin versions, affected URL, exact steps, expected/actual results and a sanitized screenshot or importer report. Use the support channel supplied with your purchase. Do not send passwords, API keys, private order/customer details or payment information in a public report.
Use this checklist after replacing the demo. These checkboxes are for your current reading session; they are not a store configuration tool.
Bundled pictures depict fictional demo instruments and scenes. Audio samples are illustrative. Replace product imagery/specifications with accurate material for the products you sell. Retain the included GPL/OFL notices when distributing code/fonts, and review demo-image provenance and redistribution rights before repackaging a theme demo. The theme's asset notes and font license files remain the detailed source records.
Your store configuration, authorized payment-provider testing and actual policy/content review complete the launch process. This guide does not turn placeholder demo claims into a live business commitment.
External links need an internet connection. This guide's navigation, search, screenshots and print layout work offline. It has no analytics, remote fonts or external JavaScript dependencies.
Prepared 5 November 2026; illustrated English guide 1.1.0 for Riff & Keys 0.7.32, Card Tools 0.1.15, Import 1.3.0 and Export 1.1.0. Theme-specific instructions were checked against the installed source. Provider references were checked against their official documentation. Screenshots show the demo and an isolated QA environment; use your own site's names and content.
The installation and editor screenshots were captured in a separate English-language WordPress documentation site. Screen labels may differ slightly in other WordPress/WooCommerce releases. Screenshot crops focus on the relevant controls; they do not show a different theme or a simulated admin interface.